
Photo Walk, Portland Maine
Had a great visit and photowalk with Sunny Pinkham today. Walked around Portland’s waterfront and some of the east end.


Peaks Island, Winter Morning Light

Raw Power 2.0: Fuji File
Raw Power 2.0 is out for Mac OS X. I tried it out on a Fuji XPro2 file taken this October on a trip with my daughter. Here’s a photo processed entirely in Raw Power 2.0 and cropped to a 4×5 aspect ratio. I added the white frame in a separate program. Right click on the image for a full size version.

Iceland, Day 5
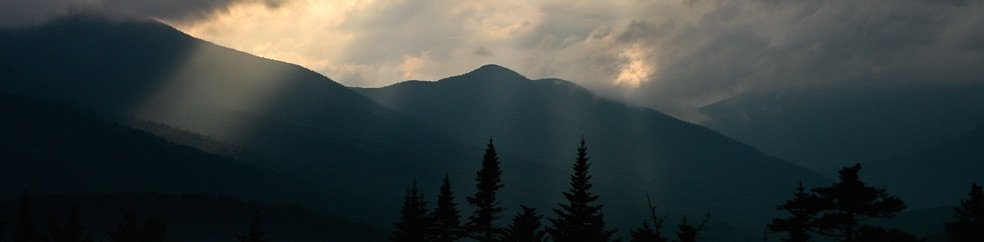
Our last full day in Iceland started in Vik. The weather started out rainy and overcast, so I headed to the beach:


Eventually, the sun began to break through:

and then, we left Vik, heading west. We stopped at Selfoss, but instead of waterfall pictures, I have several images of sheep, with which Eva and I were enthralled.

We were especially impressed with their ability to graze themselves into some precarious positions. Yes, those are sheep on the sheer face of the mountain.

Iceland, Day 4
All the while we were headed east, we made mental notes of places we wanted to stop on the return journey (we didn’t have time to do the whole Ring Road tour). On this fourth day, we stopped and photographed many times. We started by these gorgeous Icelandic horses:

(Note the snow-capped peak at the left; that’s our next destination)
The horses were exceptionally friendly, and loved being fed fresh grass (and apples):


Our next stop was to attempt to hike to the summit of the mountain between the two horses above:

The hike up was surprisingly steep, with gorgeous views everywhere since there are no trees to obstruct the views.

From here, the hiking became steeper and scree-filled:

and finally, when we arrived at the last hundred feet of vertical, the 5th class climb was not safe due to the extremely brittle rock, so we enjoyed the amazing views:


and then headed down to the camper:

I could spend all summer hiking and trail running in Iceland. I cannot get over how amazing it is to be in this landscape completely devoid of trees with stunning views everywhere. Our next stops were places we noted earlier; first were some abandoned buildings in a horse pasture:


We were politely requested to leave the field; the farmer drove by on his ATV and opened all the doors on our camper to make it clear to us that he wanted us to leave asap.
Our next stop for the day (before camping just outside Vik were just a few locations along the road:


We camped at a picnic area a few kilometers east of Vik, and had an absolutely gorgeous display of Northern lights. The best I’ve ever seen and the first Eva’s ever seen. I chose to enjoy the rapidly changing light show without photographing it.
Iceland, Day 3
Eva likes to have a plan, and on this day, she was on a mission to see the icebergs at Jökulsárlón.
After leaving Vik, we drove through an flat area with many square kilometers of moss covered rock. We stopped and photographed together for some time. Here is Eva standing in the midst of the mossing area:

There were pockets of fall color if you wandered sufficiently far:

from here, we finally made it to Jökulsárlón:

This is 248 meters deep and the bay is open to the ocean, and the interaction with the relatively warmer ocean water calves huge chunks of ice off the glacier’s end and the resulting icebergs float about in and out of the bay depending on winds and tides. Some of the ice ends up on the black sand beach, leaving little jewels of ice scattered everywhere.
There’s a seal in the picture below to give you a sense of scale:

This picture strikes me as funny; almost like we have a fake photo backdrop behind us:

Iceland Day 2
On our second day in Iceland, we began by bushwhacking up the hill from route 1 to get to the cliff summit by Seljalandsfoss. Here we had a great view of the floodplain from the glaciers above:

as well as a nice view of Seljalandsfoss from above:

From here, our plan was to make it to the small mountain peak shown in the Day 1’s post; but unfortunately the river that led to the waterfall was too wide to ford safely and we instead went on a hike up river until it became clear that we were not going to make it across. Nonetheless, it was a gorgeous day and we returned to the car after a few hours of pleasant hiking. For those interested, if you follow the river from Seljalandsfoss upstream, you come to yet another falls that it only visible (from the south) by precariously peering over the edge of a cliff. We didn’t photograph this falls because of this.

Continuing on route 1, we went to a geothermal fed pool — you can see the steam rising from a leaky pipe leading to the pool:

After leaving this hike and soak, we continued east and our day ended at Vik, where we camped for the night.
Iceland Day 1: Jet lagged
After flying out of Boston late on Wednesday night, our 5.5 hour flight landed at KEF at around 0700 Iceland time. It was pretty chilly when we stepped out of the airport terminal:

Then we headed to Touring Cars Iceland (they picked us up at KEF) and rented out motor home. The process was pretty straightforward, and after watching a video of how to use the motor home (including a smiling couple emptying the poop container), we had an actual intro and walk through of the camper. This whole process, while straightforward, took a couple of hours, as there were two other groups renting at the same time as us. The bottom line, is that when traveling to Iceland from Maine, even though the flight isn’t that long, the first half day is mainly about travel and getting set up with a rental car and provisioning with food.
Eva and I then went to Reykjavik for a short walk. Of course, we had to see, at the end of Skólavörðustígur street and in front of Hallgrímskirkja church:

the statue of Leifur Eiríksson

and then, after a short walk, we had lunch and headed out of town along the south coast. The wind was rather fierce on this first day, and coupled with severe jet lag, I had a difficult time staying awake while driving east. Eva smartly fell asleep and woke up as we approached the waterfall Seljalandsfoss. Here’s Eva in front of the falls:

Okay, notice the rainbow? My USM physics students should note that the general brightness inside the bow is greater than outside. Remember why? If not, we’ll derive all of the physics of a rainbow next semester in Physics 375 :-).
It’s cold this first day, but it was the wind that was most challenging. Eva returned to the camper, and I climbed off trail to the top of a cliff for another view of the falls that most people here do not see:

I was going to continue upward, but the wind was so strong that a scramble up the couloir to the top was not so safe. However, climbing up to this point made it obvious that there was a very nice little peak just waiting to be climbed. When I returned to the camper, I dropped the hint that the next day, we could try to hike over to the base and climb the ridge to the summit.
Do to the wind and the setting sun, we camped in a far parking lot pointing our camper into the wind, and used informative signs as a wind break. It was a rough windy night.
Flight Delay; MFA Boston
My flight to Iceland with my eldest daughter, Eva, was delayed yesterday due to thunderstorms. We had to spend an unexpected night and day in Boston, so we both went to the Museum of Fine Arts in Boston. Neither of us had been there before and our layover was a good excuse to spend some time looking at art before photographing in Iceland.
One of the first pieces of art was this >10 meter tall glass sculpture in the atrium:

There were also some other amazing glass creations displayed in a very creative fashion:

and a wonderful collection of Monet paintings, including this painting which a photograph does not do justice to seeing it in person:

I could easily spend all day with a sketchbook like this man:

Tonight, hopefully, our flight will actually happen, but Eva and I had a wonderful time exploring the museum.